Written by:
Ronnie Gonenc
Muffled calls. Quiet videos. Music that suddenly sounds like it’s coming from the bottom of a drawer.
This is one of the most common complaints we hear—and in most cases, the phone isn’t broken at all. After years of hands-on diagnostics and repairs, we’ve found that clogged speaker and earpiece mesh is one of the most misunderstood phone issues. Many people assume they need a new speaker or even a new phone, when the real problem is dirt packed into places you can barely see.
That said, cleaning your phone the wrong way can turn a minor issue into a major repair. This guide explains how to clean your phone speaker safely, what not to do, and when cleaning stops being the right solution.
Section 1: Why Speaker and Earpiece Mesh Fails Over Time
Your phone’s speaker and earpiece mesh are designed to balance two things: airflow and protection. The mesh keeps dust and debris out while still allowing sound to pass through clearly. Over time, that balance breaks down.
Here’s why buildup happens so easily:
- Phones live in pockets, purses, gym bags, and cars
- Skin oils and sweat trap dust particles
- Makeup and fabric lint compress into the mesh
- Humidity causes debris to stick instead of fall out
Unlike cracks or water damage, clogged mesh doesn’t look dramatic—but it directly affects sound quality. According to electronics maintenance data, blocked speaker grills are one of the top reasons users seek phone repair for “audio failure,” even when the speaker itself still works perfectly.
Section 2: Cleaning Methods That Damage Speakers (And Why They Fail)
Before covering what works, it’s important to understand what causes the damage we see most often at the repair bench.
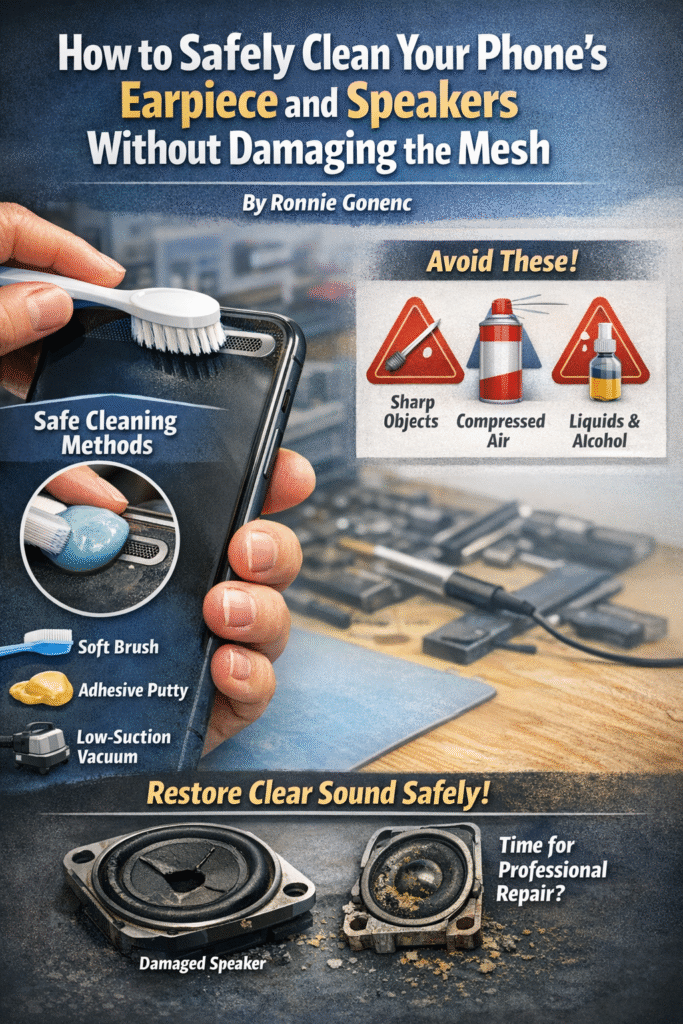
Sharp Objects
Needles, pins, paperclips, SIM tools—these tear the mesh instantly. Once punctured, dust enters freely, and sound quality usually gets worse over time.
Compressed Air
Blowing air directly into the speaker forces debris deeper into the phone. We regularly see phones that came in for “quiet audio” and left needing full speaker replacement because debris was pushed into the speaker cone.
Liquids and Alcohol
Even small drops can wick through the mesh and affect internal components. Water resistance does not protect against pressure or residue buildup inside speaker chambers.
Aggressive Scrubbing
Hard brushes and repeated pressure can deform the mesh, changing how sound travels through it.
Most of these mistakes come from good intentions—but they’re responsible for a large percentage of avoidable repairs.
Section 3: Technician-Approved Ways to Clean Phone Speakers Safely
These methods are used during professional diagnostics because they minimize risk.
Soft-Bristle Brush (Primary Method)
A clean, dry, soft toothbrush works best.
- Brush side-to-side, not downward
- Use light pressure only
- Hold the phone speaker-side down so debris falls out
This alone resolves many muffled speaker issues on both iPhone and Android devices.
Electronics-Safe Adhesive Putty
Used correctly, this can lift debris out of mesh pores.
- Gently dab—never press
- Avoid dragging across the surface
- Use small amounts only
This method is especially effective for makeup or lint buildup.
Low-Suction Vacuum (Optional)
Held slightly away from the speaker opening, not touching it.
- No attachments pressed to the grill
- Short bursts only
This helps remove loosened debris after brushing.
Section 4: Step-by-Step Cleaning Process (Detailed)
- Power off your phone completely
- Remove the case and any accessories
- Inspect the mesh under bright light
- Hold the phone with the speaker facing downward
- Gently brush across the mesh for 15–20 seconds
- Lightly dab adhesive putty if needed
- Test audio before repeating
If sound improves, stop. Repeating the process too many times increases the risk of damage.
If there’s no change at all, the issue may be internal—common with water exposure, corrosion, or aging speakers. This is when a professional diagnostic from a Samsung repair or multi-brand technician is recommended.
Section 5: When Cleaning Is No Longer Enough
Cleaning won’t fix:
- Water-damaged speaker components
- Corrosion inside the speaker chamber
- Torn or deformed mesh
- Blown or distorted speaker cones
In these cases, continued DIY attempts often make repairs more expensive. A proper inspection can determine whether cleaning, repair, or replacement is the most cost-effective option.
Section 6: Conclusion and Final Thoughts
Cleaning your phone’s earpiece and speakers is one of the most overlooked forms of maintenance—and one of the easiest ways to restore sound clarity when done correctly. The key is patience and restraint.
Most serious speaker damage we see isn’t from age or defects. It’s from well-meaning cleaning attempts that go too far. Knowing when to stop is just as important as knowing how to start.
If safe cleaning doesn’t solve the issue, professional help will save you time, money, and frustration in the long run.
FAQs
How often should I clean my phone speakers?
Every 2–3 months, or whenever sound quality noticeably drops.
Can I use a toothpick wrapped in cloth?
Not recommended. It still applies pressure and can push debris inward.
Are water-resistant phones safer to clean?
Water resistance does not protect speaker mesh from damage or residue.
Why does sound sometimes get worse after cleaning?
Debris may have been forced deeper, or the mesh may be damaged.
Disclaimer
This article is for informational purposes only. Improper cleaning methods can damage internal components. If sound issues persist, consult a qualified phone repair professional for accurate diagnosis and service.